Wednesday, April 14, 2010

Grilled Pork Chops with Pineapple


I was so excited yesterday to see that Kroger had boneless pork loin chops on sale for $1.88 per pound. This is one of my favorite meals to cook as all three of my children actually like it, and it involves little effort from me. (A definite win-win situation in my house!)

Normally I use one of the seasoning packets from Weber Grill Creations pictured below. If you clip coupons, you can pick up one of these envelopes for free with double coupons. But, even if you pay full price, it is less than a dollar and the taste is really great.

This time, I wanted to try and duplicate the results I get with seasoning mix with a home-made recipe.

The package in the picture shows 3.88 lbs of pork chops. I did not use all of these chops. I used 7 of them and put the other 2 in a bag for later use. Not shown in the picture is the can of pineapple rings that I bought on sale a few weeks ago for 50 cents per can. Including the cost of the wine and olive oil, I estimate this dinner to cost $7.50 and fed our family of 5 easily.

You will need:
1/4 cup white wine (I used Chardonnay)
1/4 cup olive oil
2 teaspoons Italian Seasoning
2 teaspoon kosher salt
1 teaspoon garlic powder
1 teaspoon onion powder
1/4 teaspoon red pepper flake
1 teaspoon lemon juice
2 lbs. pork loin chops (boneless)
1 can pineapple rings

First, mix the white wine, olive oil, seasonings, salt, and lemon juice in a measuring cup and whisk together using a fork or small whisk. Place pork chops in a zipper bag and pour the marinade over the chops. Seal bag and place in the fridge to marinade for at least 2 hours.


What I did next is heat up the indoor grill on medium high heat. (I use a George Foreman, but you could just as easily use a grill pan on the stove or an outdoor grill.) After it has had 4-5 minutes to heat up, I added the pork chops and closed the grill. After 4 minutes, I opened the grill and rearranged since the chops closest to the hinge on my grill cook faster than the rest of the areas. Another 4 minutes and I did another quick rearrange. Then I let the chops cook for just another minute or two more. You want to remove them from the grill when you see grill marks on the chops and they are still a little bit pink when you cut into them. They will continue to cook internally as you let them rest for a few minutes.
After giving my daughter a quick taste test of the pineapple in the can, I added the rings to the grill to cook for 4 minutes so that they were heated all the way through. If I had done this on the outdoor grill, they likely would have had some beautiful char marks as well. (But, I prefer the indoor grill for the ease of cleaning.) Remove the pineapple when they are heated all the way through and cut into bite sized pieces.
The taste on these pork chops was especially yummy if you add a small bite of pineapple to every bite of pork chop on your fork. Unfortonately, my youngest is sick today, and he has refused to eat anything other than a peanut butter sandwich, but my 9 year old thought these chops were DE-licious, but she doesn't care for the pineapple. So, she had her serving sans pineapple.
NOTE: Be sure that you are using KOSHER salt when you measure. If you use table salt, you wont want to use nearly as much salt at the crystals are much smaller and take up about 1/3 the space.

Sunday, April 11, 2010

Meatloaf


Meatloaf is comfort food. It takes me back to being a little girl sitting around the kitchen table with my sisters and my parents. It is also my 9 year old daughter's favorite food for dinner. She asks me weekly if I will make meatloaf for her, but I generally only make it once a month. Since ground beef was on sale last week, I picked up a 3.5 lb. package and used 2 lbs. to make meatloaf. The rest I browned with a bit of chopped onion and saved to make stroganoff later in the week. I generally use 80% lean ground beef to make meatloaf. I have used 90% or even 95% lean, but in my opinion it is not as flavorful and turns out a bit to dry. The downside to using 80% is that I have to drain the grease from the pan several times while baking, but I think this is worth it for the results. (In this case, Angus 80% lean ground beef was on sale for $1.97 per lb. The rest of the items are staples in my house. I estimate the total cost of this 2 lb. meatloaf at about $5 total. With an entire bag of frozen green beans and a bowl of mashed potatoes, this complete meal was about $6.50 and fed 5 with leftovers.)

I used the following:
2 lbs. ground beef (80% lean)
1 package onion soup mix
3/4 cup Itialian seasoned bread crumbs
1/2 cup ketchup
1 T spicy brown mustard
2/3 cup milk
2 eggs (slightly beaten)

Preheat oven to 350 degrees.


Mix all ingredients together in a large bowl carefully. You want to thoroughly combine but also handle the meat as little as possible. Mixing with your hands is best, but it is a bit messy. Once combined, form into a loaf shape inside of a 4x9 loaf pan.


Place in oven to bake for approximately 1 hour. After about 40 minutes, pull out the pan and drain the grease as much as you can. Then place the pan back in the oven for another 10 minutes, then drain again and back in again for 10 minutes, then drain again. At the one hour mark, the meat should be "almost" done and you have likely drained off quite a bit of grease. At this point, I drizzle some ketchup across the top of the loaf and place back in the oven for another 10 minutes. Some people like to use canned tomatoes to make a sauce, but my family prefers the simple drizzle of ketchup. Once out of the oven, let rest for about 5 minutes before serving.

I like to serve with mashed potatoes and some sort of green vegetable.

Sunday, April 4, 2010

Butterscotch Pie


It's Easter and holiday times mean family coming together. This year, my parents are coming for lunch, and in memory of my grandmother, I made butterscotch pie for dessert.

Butterscotch pie is my dad's favorite dessert. He told me that he remembers as a young boy sitting in the kitchen while his mother fussed around the stove trying to get the butterscotch custard to set just right. The only people who made this pie to my dad's liking were my grandmother and my Aunt Juanita. Both of these wonderful ladies have passed away and gone to be with the Lord. I know that I cannot compare to either of these ladies' cooking ability. But, I am thankful that my cousin Shannon shared this family recipe with me, and it warms my heart to have a copy of this recipe in my Aunt Juanita's handwriting. The first time I used Juanita's recipe, my dad said that although the flavor was close, my grandma used to use brown sugar in the meringue. So, now I make this recipe with a brown sugar meringue. At Thanksgiving, Dad said it was just like grandma's. (I don't actually believe him, but he is the greatest dad in the whole world. So, I'll keep making this pie and remembering my grandma.)

You'll Need:
1 pre-baked pie crust
3 eggs separated
1 cup brown sugar (packed)
1/8 tsp. salt
5 rounded tablespoons flour
1-1/2 cups milk
4 tablespoons butter
2 teaspoons vanilla (1 for meringue and 1 for custard)
6 tablespoons brown sugar (for meringue)

Start by separating the eggs. I went ahead and put the whites into the bowl for my mixer, and I put the yolks directly into top pan for the double boiler. Set aside whites for later. Whisk to break up the yolks. Mix in salt, then milk, then flour, then brown sugar.

Note: My grandmother only used Imperial brand brown sugar. I remember her buying a different brand one time for her cookies and the results were simply not the same. So, I only use Imperial brand sugar for this recipe as well.

You'll want to go ahead and put the butter into the pan as well. Then move the pan over on top of the boiling water in the bottom part of your double boiler. It will look something like this.


This is the tricky part. Just keep stirring while the bottom part boils away. As the mixture heats up it will look smoother and smoother. Just keep stirring. Then the mixture will take on the color of caramel. That means you are getting closer to being done. Just keep stirring. The tricky part of this recipe is if you remove it from the stove too soon, you will have butterscotch soup instead of butterscotch pie. (Just being thick enough to coat the back of a spoon is NOT thick enough.) You want the custard to be almost as thick as you expect the final chilled custard to be before you remove it from the stove. The custard does not thicken much after you remove it from the stove. So, just keep stirring until you get it thick enough. Then remove it from the stove and allow to cool for a few minutes on the counter. Next stir in 1 teaspoon of vanilla before pouring it into your pre-baked pie crust.

Time to make the meringue. Remember those egg whites you set aside earlier? Beat these with your mixer until you get stiff peaks Then add 6 tablespoons of brown sugar and 1 teaspoon of vanilla. Mix again until incorporated.


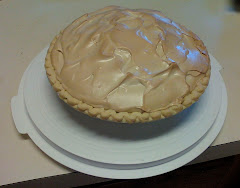
Spread the meringue across the top of the pie. For this, I generally scoop out several large spoonfuls across the pie then use a spatula to spread them together across the pie like below.

Next, place the pie in a 350 degree oven for about 8-10 minutes until slightly browned on top. Remove from oven and allow to cool. Then refrigerate for at least 2 hours before serving.

I haven't told my family about this blog yet, but eventually I will. So, for my family, here is the original recipe in Aunt Juanita's handwriting. (Thanks, Shannon!)

Friday, April 2, 2010

Quiche (AKA "Scrambled Egg Pie")


My 9 year old daughter loves quiche, but when she was little she younger she turned her nose up to the mention of any dish that she wasn't familiar with the name of. So, one night I wanted to make quiche for dinner and she turned her nose up and said "I don't want that." without even listening to hear what it was. So, I asked her, "Well, what if I make you a scrambled egg pie?" and she was interested. She asked what was in it, and I replied "Hmmm... Let's see. There's scrambled eggs of course, and some cheese, and ... bacon". Once I said that magic word "bacon" out loud, she was hooked. She begged me to please please please make her a scrambled egg pie. So, I made a bacon and cheese quiche and we all called it "scrambled egg pie" when we sat down at the dinner table. Success!

Eggs are cheap and I always have at least a dozen in the fridge. I also buy shredded cheese when the store has them on sale for 4 packages for $5 and throw them all in the freezer. When bacon goes on sale for "buy one get one free" I buy 6 packages and put 5 of them in the freezer. Pie crusts are inexpensive to make, but I do buy the pre-made ones when on sale (and many times with coupons too) and keep several in my freezer on hand as well. So, on any given day, I can put together a quiche for only a few dollars. One quiche is enough to feed myself and my children. If my husband is home for the meal, two quiches are needed. This quiche cost me about $4 total.


You'll need the following ingredients:
1 deep dish pie crust
6 eggs
1 package bacon (I prefer center cut)
1/2 cup shredded cheese
1 cup milk
salt and pepper to taste


Preheat oven to 350 degrees

Start with your pie crust. If you are using a pre-made one that is currently in the freezer, pull it out and allow it to thaw on the counter. Once thaw you'll need to start by using a regular table fork to gently poke holes around the bottom of the pie crust and a few on sides as well. You want to press gently so you don't crack the crust (if it cracks thaw it a little longer) but firmly enough to press all the way through to the pie pan. The holes will help keep you crust from forming bubbles while it bakes so that it will maintain it's shape. Next, take some strips of aluminum foil and cover the perimeter (outside edge) of your pie crust so that it won't brown when you pre-bake it. (Although pre-baking the crust isn't completely necessary for quiche, I believe it helps keep the bottom of the crust from getting soggy when you make the quiche. So, if a soggy crust doesn't bother you, feel free to skip pre-baking. But, seriously it doesn't take long to pre-bake a crust, and your quiche will be oooh so yummier if you do.) Pre-bake the crust in your oven for about 10-12 minutes. Remove from oven and remove foil strips.


Cook your bacon until crispy and drain on paper towels. Then take a paper towel and blot any of the spots you may have missed. In a 1 quart bowl, beat 6 eggs together with a wire whisk until the yolks and whites are incorporated into each other. Add 1 cup of milk and continue whisking. Add salt and pepper to your tastes while whisking. I use about 1/2 teaspoon of kosher salt and a pinch of pepper.


Chop your bacon and place in the bottom of your pre-baked pie crust (after eating 2-3 whole slices while no one is looking. Yum... bacon) Then sprinkle about 1/2 cup of your favorite shredded cheese on top of the bacon.


Pour your egg mixture on top, then take your fork that you used for poking holes earlier and very very very gently scrape the bottom of the ingredients around the bottom of your pie plate. Be careful here, you are trying to just barely lift the bacon and cheese up from the bottom layer of the crust so that you don't end up with a "layered" quiche. I suppose you could have whisked the bacon and cheese in with the egg mixture and poured it all at once into the pie plate, but when you do that, all of your cheese ends up in the "middle" of the quiche. And, I really like the way that pouring it over the top causes some of the cheese to float to the top while others are completely covered in egg mixture.


Place in oven and bake for 60 minutes. Remove from oven and allow to cool for 5 minutes before serving.


Modifications and tips:
  • You can make any kind of quiche you want with any types of cheese or veggies you like.
  • I like to add thawed frozen spinach to quiche, but if you do be sure to thaw it completely and then strain it pressing it against the strainer to get all the liquid out. Otherwise you'll end up with a watery mess in your quiche.
  • Another idea is to thaw some frozen chopped broccoli and add some diced leftover ham. YUM!
  • Most recipes I have seen call for using swiss cheese in quiche, but I prefer cheddar with bacon.
  • Use what you like or what you have on hand. There is no need to thaw your cheese if you have it in the freezer, but if you are adding frozen vegetables to your quiche, I recommend you steam them part of the way in the microwave first to thaw them out.

Enjoy!